
구글 스프레드 시트를 이용하여 서버 없이 이메일을 보낼 수 있는 방법이 있다.
https://github.com/dwyl/learn-to-send-email-via-google-script-html-no-server#how
GitHub - dwyl/learn-to-send-email-via-google-script-html-no-server: An Example of using an HTML form (e.g: "Contact Us" on a web
:email: An Example of using an HTML form (e.g: "Contact Us" on a website) to send Email without a Backend Server (using a Google Script) perfect for static websites that need to collect d...
github.com
원본 링크이다.
내가 만들어볼 당시에는 본문내용과 약간 달라진게 있어서 새로 작성해보고자 한다.
본문의 구성도 원본과 비슷하게 구성을 해보았다.
Why?
서버가 없거나 서버를 원하지 않을때, "정적" HTML 페이지에서 이메일 보내는 방법이 필요했습니다.
Key Advantages(주요 이점들)
- 배포/유지보수/지불 해야하는 "백엔드"가 필요 없습니다.
- 모든 측면에서 사용자 맞춤 커스터마이징 이 가능합니다!
- 모든 곳에서 허용된 Google Mail 을 통해서 이메일을 전송합니다. ( 높은 전송 성공률 )
- 어떤 데이터든 쉽게 볼 수 있는 스프레드시트 에 수집/저장 합니다.
- ( 코딩을 전혀 모르는 사람과 공유해야하는 경우에도 완벽합니다. )
What?
쉽지만 유지보수가 필요한 서버를 사용하여 이메일을 보내는 대신, Google을 사용하여 이메일을 보내고 Google 스프레드시트를 사용하여 데이터를 추적하세요!
데이터를 보내는 위치에 상관하지 않고, 받은 편지함(messy ... yuck)에 제출된 데이터를 관리하려면 http://formspree.io/과 같은 무료 서비스를 사용하여 Form 제출을 처리할 수 있습니다.
또는... 몇 분 동안 투자하고 데이터를 비공개로 관리할 수 있습니다. 당신이 선택하세요.
How?
1. 하단의 Sample Spreadsheet 복사하기
Sample: https://docs.google.com/spreadsheets/d/1Bn4m6iA_Xch1zzhNvo_6CoQWqOAgwwkOWJKC-phHx2Q/copy
당신의 Google 계정에 로그인하고 "사본 만들기"를 클릭합니다.

아래와 같이 나오면 됩니다.

참고 : 복사본 이름을 원하는대로 변경해도 결과에 아무런 영향을 미치지 않습니다.
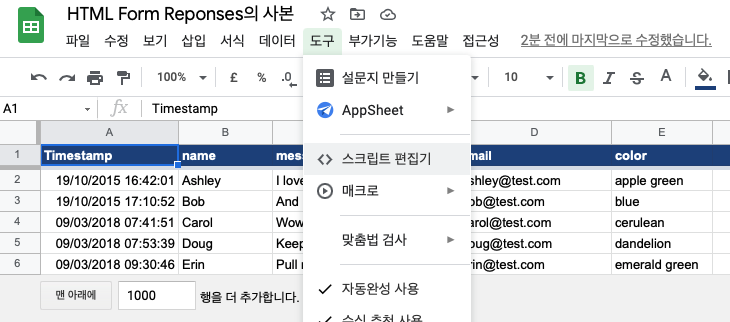
2. 스크립트 편집기 열기
"도구" > "스크립트 편집기..."를 눌러 편집기를 여세요.
스크립트 편집기에 아래 코드를 붙혀넣습니다. (소스코드가 들어가있으면 그대로 사용하시면 됩니다.)
/******************************************************************************
 * This tutorial is based on the work of Martin Hawksey twitter.com/mhawksey  *
 * But has been simplified and cleaned up to make it more beginner friendly   *
 * All credit still goes to Martin and any issues/complaints/questions to me. *
 ******************************************************************************/

var TO_ADDRESS = "contact.nelsonic@gmail.com"; // where to send form data

function doPost(e) {

  try {
    Logger.log(e); // the Google Script version of console.log see: Class Logger
    MailApp.sendEmail(TO_ADDRESS, "Contact Form Submitted",
                      JSON.stringify(e.parameters));
    // return json success results
    return ContentService
          .createTextOutput(
            JSON.stringify({"result":"success",
                            "data": JSON.stringify(e.parameters) }))
          .setMimeType(ContentService.MimeType.JSON);
  } catch(error) { // if error return this
    Logger.log(error);
    return ContentService
          .createTextOutput(JSON.stringify({"result":"error", "error": e}))
          .setMimeType(ContentService.MimeType.JSON);
  }
}
3. 스크립트에서 TO_ADDRESS 를 설정하기

소스코드 8열의 TO_ADDRESS 부분에 자신의 이메일을 작성한다.
4. 스크립트를 새로운 버전 으로 저장하기
본문에서는 새로운 버전을 만들라고 하는데, 그러지 않아도 된다.
맥은 command+s, 윈도우는 ctrl+s로 저장한다.
5. 업데이트 된 스크립트를 웹앱으로 배포하기

배포 - 새 배포를 선택한다.

배포를 클릭하게되면 권한을 설정하는 창이 뜬다.


권한 설정까지 완료하게 되면

script url이 생성된다.
이 url을 잘 저장해 놓아야 한다.
7. 기본 HTML Form 만들기
이 저장소의 index.html 템플릿을 사용하여, 기본 Form 형식을 가진 HTML 파일을 만들어서 저장한다.
<!doctype html>
<html lang="en">
<head>
<meta charset="utf-8">
<meta name="viewport" content="width=device-width, initial-scale=1.0">
<meta name="description" content="contact form example">
<title>Contact Form Example</title>
</head>
<body>
<h2 class="content-head is-center">Contact Us!</h2>
<aside>
<p>
We would <em>love</em> to hear from you! </p>
<p>Please use the <b><em>Contact Form</em></b>
to send us a message.
</p>
</aside>
<!-- START HERE -->
<link rel="stylesheet" href="https://unpkg.com/purecss@1.0.0/build/pure-min.css">
<link rel="stylesheet" href="https://maxcdn.bootstrapcdn.com/font-awesome/4.4.0/css/font-awesome.min.css">
<!-- Style The Contact Form How Ever You Prefer -->
<link rel="stylesheet" href="style.css">
<form class="gform pure-form pure-form-stacked" method="POST" data-email="example@email.net"
action="아까 복사한 url을 여기에 붙혀놓으면 된다!">
<!-- change the form action to your script url -->
<div class="form-elements">
<fieldset class="pure-group">
<label for="name">Name: </label>
<input id="name" name="name" placeholder="What your Mom calls you" />
</fieldset>
<fieldset class="pure-group">
<label for="message">Message: </label>
<textarea id="message" name="message" rows="10"
placeholder="Tell us what's on your mind..."></textarea>
</fieldset>
<fieldset class="pure-group">
<label for="email"><em>Your</em> Email Address:</label>
<input id="email" name="email" type="email" value=""
required placeholder="your.name@email.com"/>
</fieldset>
<fieldset class="pure-group">
<label for="color">Favourite Color: </label>
<input id="color" name="color" placeholder="green" />
</fieldset>
<fieldset class="pure-group honeypot-field">
<label for="honeypot">To help avoid spam, utilize a Honeypot technique with a hidden text field; must be empty to submit the form! Otherwise, we assume the user is a spam bot.</label>
<input id="honeypot" type="text" name="honeypot" value="" />
</fieldset>
<button class="button-success pure-button button-xlarge">
<i class="fa fa-paper-plane"></i> Send</button>
</div>
<!-- Customise the Thankyou Message People See when they submit the form: -->
<div class="thankyou_message" style="display:none;">
<h2><em>Thanks</em> for contacting us!
We will get back to you soon!</h2>
</div>
</form>
<!-- Submit the Form to Google Using "AJAX" -->
<script data-cfasync="false" src="form-submission-handler.js"></script>
<!-- END -->
</body>
</html>
8. 브라우저에서 HTML Form (페이지) 열기

아무렇게나 작성 후 Send버튼을 눌러보게 되면 페이지가 아래 사진처럼 바뀌게 된다.

9. 설정했던 이메일 계정의 받은 편지함 확인하기
본인이 설정한 이메일로 메일이 하나 온걸 확인할 수 있을 것이다. 짞짞짞 성공이다!

10. Send버튼을 눌렀을 때 화면이 안바뀌게 하고싶어요!
- form 태그 속성에 target = iframe1 을 적어준다.
- form 태그가 끝난 뒤 <iframe id="iframe1" name="iframe1" style="display:none"></iframe> 를 적어준다.
전체코드
<!doctype html>
<html lang="en">
<head>
<meta charset="utf-8">
<meta name="viewport" content="width=device-width, initial-scale=1.0">
<meta name="description" content="contact form example">
<title>Contact Form Example</title>
</head>
<body>
<h2 class="content-head is-center">Contact Us!</h2>
<aside>
<p>
We would <em>love</em> to hear from you! </p>
<p>Please use the <b><em>Contact Form</em></b>
to send us a message.
</p>
</aside>
<!-- START HERE -->
<link rel="stylesheet" href="https://unpkg.com/purecss@1.0.0/build/pure-min.css">
<link rel="stylesheet" href="https://maxcdn.bootstrapcdn.com/font-awesome/4.4.0/css/font-awesome.min.css">
<!-- Style The Contact Form How Ever You Prefer -->
<link rel="stylesheet" href="style.css">
<form class="gform pure-form pure-form-stacked" method="POST" target="iframe1" data-email="jhKim0254@gmail.com"
action="https://script.google.com/macros/s/AKfycbwqViw6xIV6JJ8BoN_5d3M3YRDA9NAyVFjLl1evxpcxufjKyXhqRTJPQDH35SsjlmCPDA/exec">
<!-- change the form action to your script url -->
<div class="form-elements">
<fieldset class="pure-group">
<label for="name">Name: </label>
<input id="name" name="name" placeholder="What your Mom calls you" />
</fieldset>
<fieldset class="pure-group">
<label for="message">Message: </label>
<textarea id="message" name="message" rows="10"
placeholder="Tell us what's on your mind..."></textarea>
</fieldset>
<fieldset class="pure-group">
<label for="email"><em>Your</em> Email Address:</label>
<input id="email" name="email" type="email" value=""
required placeholder="your.name@email.com"/>
</fieldset>
<fieldset class="pure-group">
<label for="color">Favourite Color: </label>
<input id="color" name="color" placeholder="green" />
</fieldset>
<fieldset class="pure-group honeypot-field">
<label for="honeypot">To help avoid spam, utilize a Honeypot technique with a hidden text field; must be empty to submit the form! Otherwise, we assume the user is a spam bot.</label>
<input id="honeypot" type="text" name="honeypot" value="" />
</fieldset>
<button class="button-success pure-button button-xlarge">
<i class="fa fa-paper-plane"></i> Send</button>
</div>
<!-- Customise the Thankyou Message People See when they submit the form: -->
<div class="thankyou_message" style="display:none;">
<h2><em>Thanks</em> for contacting us!
We will get back to you soon!</h2>
</div>
</form>
<!-- Submit the Form to Google Using "AJAX" -->
<script data-cfasync="false" src="form-submission-handler.js"></script>
<iframe id="iframe1" name="iframe1" style="display:none"></iframe>
<!-- END -->
</body>
</html>Send 버튼을 눌러도 반응은 없지만, 이메일을 확인해보면 전송이 된것을 알 수 있다.
'프로그래밍 > Web' 카테고리의 다른 글
| [WEB] Node.js를 더 쉽게 쓰기위한 PM2 소개 (2) | 2021.12.03 |
|---|---|
| [WEB] 진행바(Progress Bar) 추가하기(블로그, 쇼핑몰) (5) | 2021.11.06 |
| Mixed content / Failed to load response data... 문제 해결방법 (0) | 2021.10.30 |
| Sweetalert로 예쁜 알림창, 경고창을 띄우자 (5) | 2021.10.28 |
| [부트스트랩5] 버튼 사용하기 (0) | 2021.10.28 |


댓글